Documentation
BeamNews - Complete Flutter News App For Wordpress
Thank you so much for purchasing our product from codester.
- Version: 1.0
- Author: Universal Weblinks
- Created: 13th Feb, 2023
- Updated: 13th Feb, 2023
If you have any questions that are beyond the scope of this help file, Please feel free to email us via Item Support Page.
Introduction
This is the BeamNews Configuration and Setup Document. You can configure your WordPress site and the app (Android & iOS) by following this documentation.
You are free to use any WordPress news/blog theme of your choice. The app has no relation to the theme as the app fetches data automatically via WP REST API.
- Before starting the configuration, Please make sure that your WordPress website is up and running
- Follow the WORDPRESS SETUP first and then follow the APP SETUP.
Note: We provide installation/reskin service for the BeamNews app. If you can’t do the configuration/installation by yourself, we can do that for you for a fee. You can email us at [email protected] for more details.
WordPress Setup
This section takes you through the steps involved in setting up your wordpress site for BeamNews App.
Install Plugins
Install & Activate These WordPress Plugins
You have to install some WordPress plugins which are required for the app functionality. You can install these plugins from your WordPress dashboard by searching for them on the plugins section. Install and activate them. All of them are completely free on the wp plugin store.
- JWT Authentication for WP REST API (Required)
- FCM Push Notification from WP (Required)
- Code Snippets (Required)
- ACF to REST API (Required)
- Advanced Custom Fields (Required)
- REST API Password Reset with Code (Required)
- WordPress Popular Posts (Recommended)
- WP REST Cache (Recommended)
- Easy WP SMTP (Recommended especially if you are using a shared hosting server or if your wordpress email is not working. You should follow the additional steps required for setup by following the plugin documentation. This is required for sending password reset email to the users)
JWT Setup
For User Authentication (Registration & Login)
You will have to edit your .htaccess file by adding two lines of code.
You can get this file by accessing your Cpanel > File manager > public_html > your site directory
Once you locate this file, right click on it and go to edit file then add the following two lines under the RewriteEngine On line
then save.
                RewriteCond %{HTTP:Authorization} ^(.*)
                RewriteRule ^(.*) - [E=HTTP_AUTHORIZATION:%1]
Second Step, you will have to edit your wp-config.php file by adding two lines of code.
You will get the file in the same directory as your .htaccess file described above.
Once you locate this file, right click on it and go to edit file then add the following two lines under the define( 'WP_DEBUG', false ); line.
                define('JWT_AUTH_SECRET_KEY', 'your-top-secret-key');
                define('JWT_AUTH_CORS_ENABLE', true);
After adding these two lines of code, you have to replace the your-top-secret-key in the first line with a secret key.
To get a secret key, visit this URL, copy the AUTH_KEY key and paste it here.
After this, your lines will look like the image below:

Now save the file and that's it.
FCM Push Notification Setup
For Push Notifications
This plugin is required to send push notifications for posts directly from your WordPress admin dashboard. You must have installed and activated it from previous steps. Now follow these steps to complete the setup:
- Go to
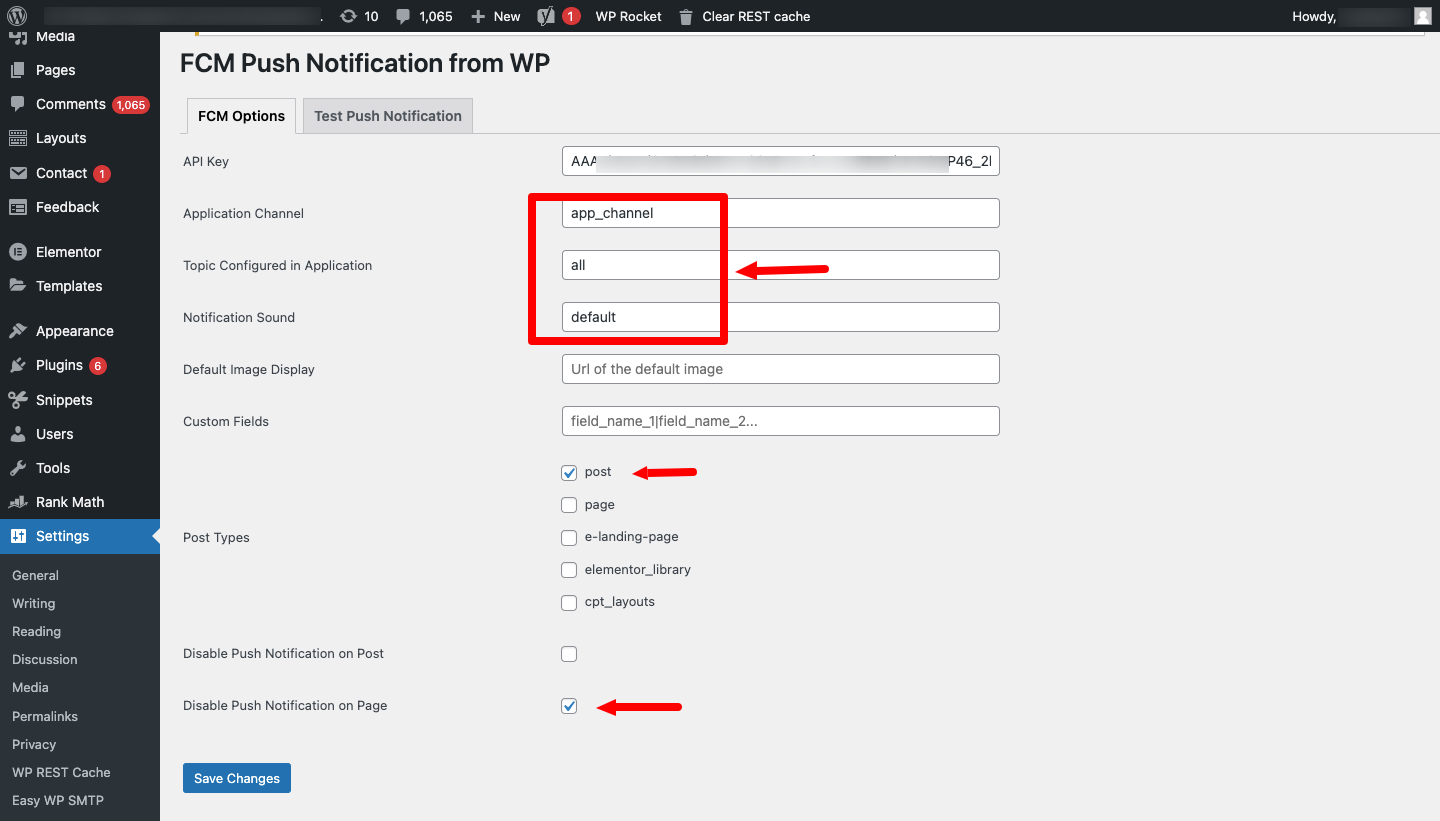
Settings > FCM Push Notification from WPon your WordPress dashboard. You will see a configuration page like this: - Setup the Application Channel, Topic Configured in Application, Notification Sound & others exactly as the image above except the API Key. Save that.
- Your API Key is missing. You will get the API Key from the App Setup Section of this doc for push notifications. When you do, make sure to come back to this section and update your API Key then save.
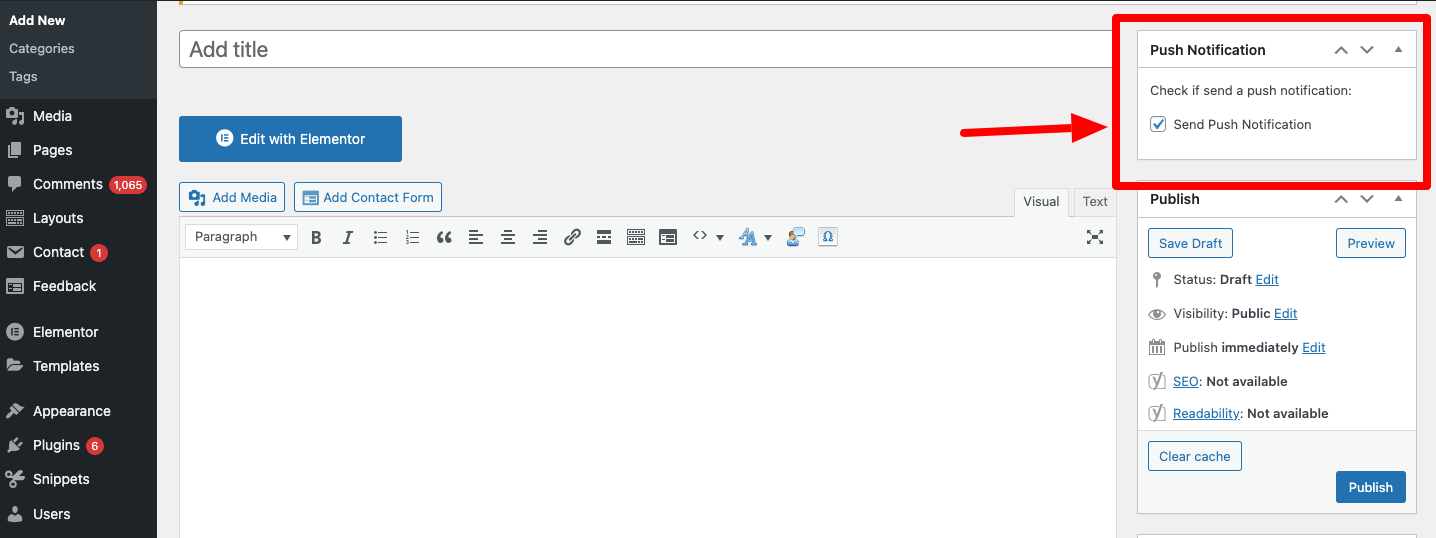
- After this setup, you can send push notifications on every post created & updated from your WordPress dashboard as shown in the image below:
Import ACF File
For Categories Thumbnails
This plugin is required to add Thumbnails when creating or updating Categories directly from your WordPress admin dashboard. You must have installed and activated the ACF to REST API & Advanced Custom Fields plugins from previous steps. Now follow these steps to complete the setup:
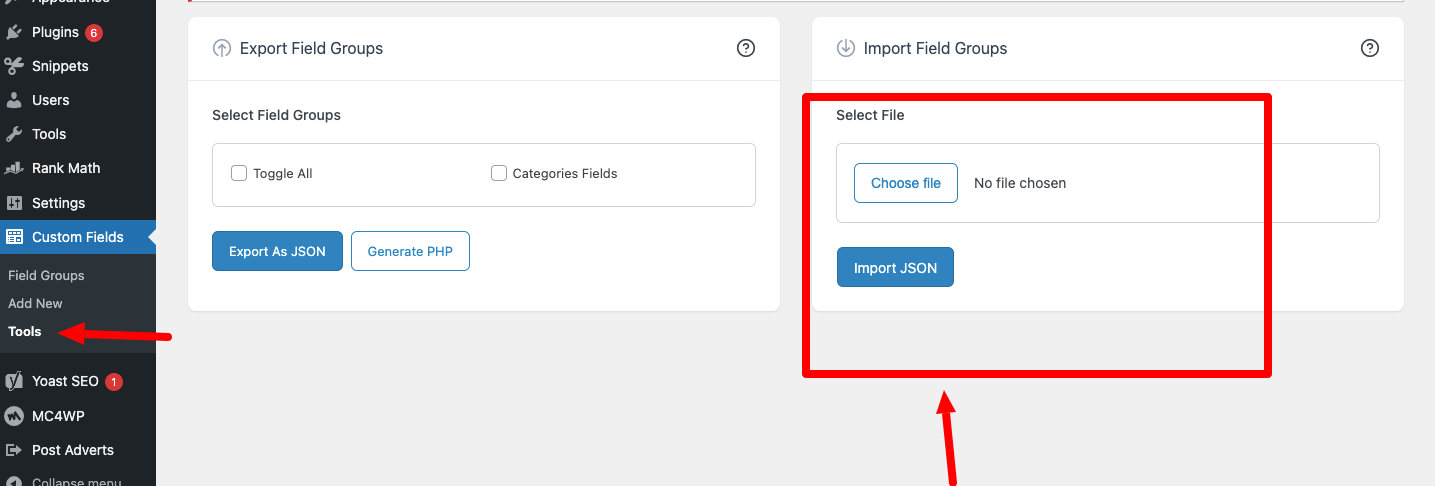
- From the main_files folder you downloaded from Codester, you got an
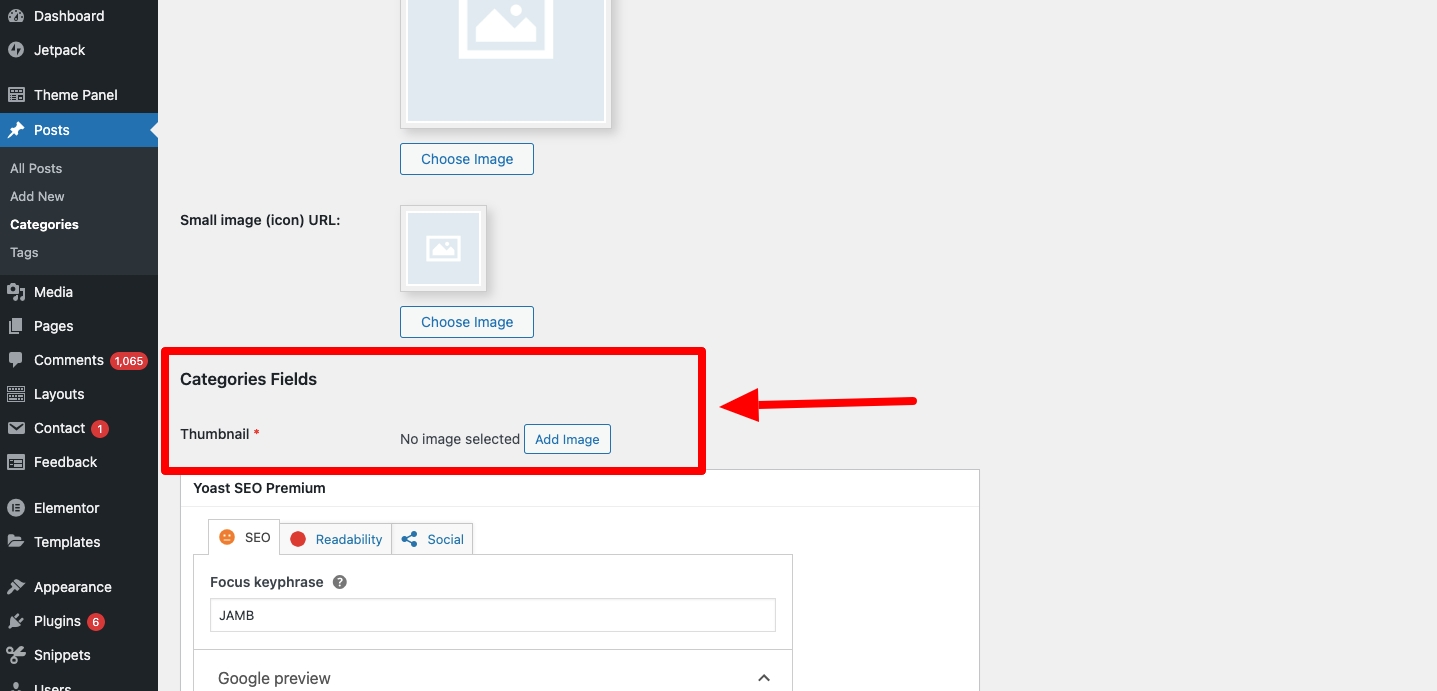
acf.jsonfile. Now go toCustom Fields > Toolson your WordPress dashboard. Use the Import Field Groups section. Select theacf.jsonFile and then click on Import JSON as shown in the image below: - After this setup, you can now add thumbnails to your existing or new categories from your WordPress dashboard as shown in the image below:
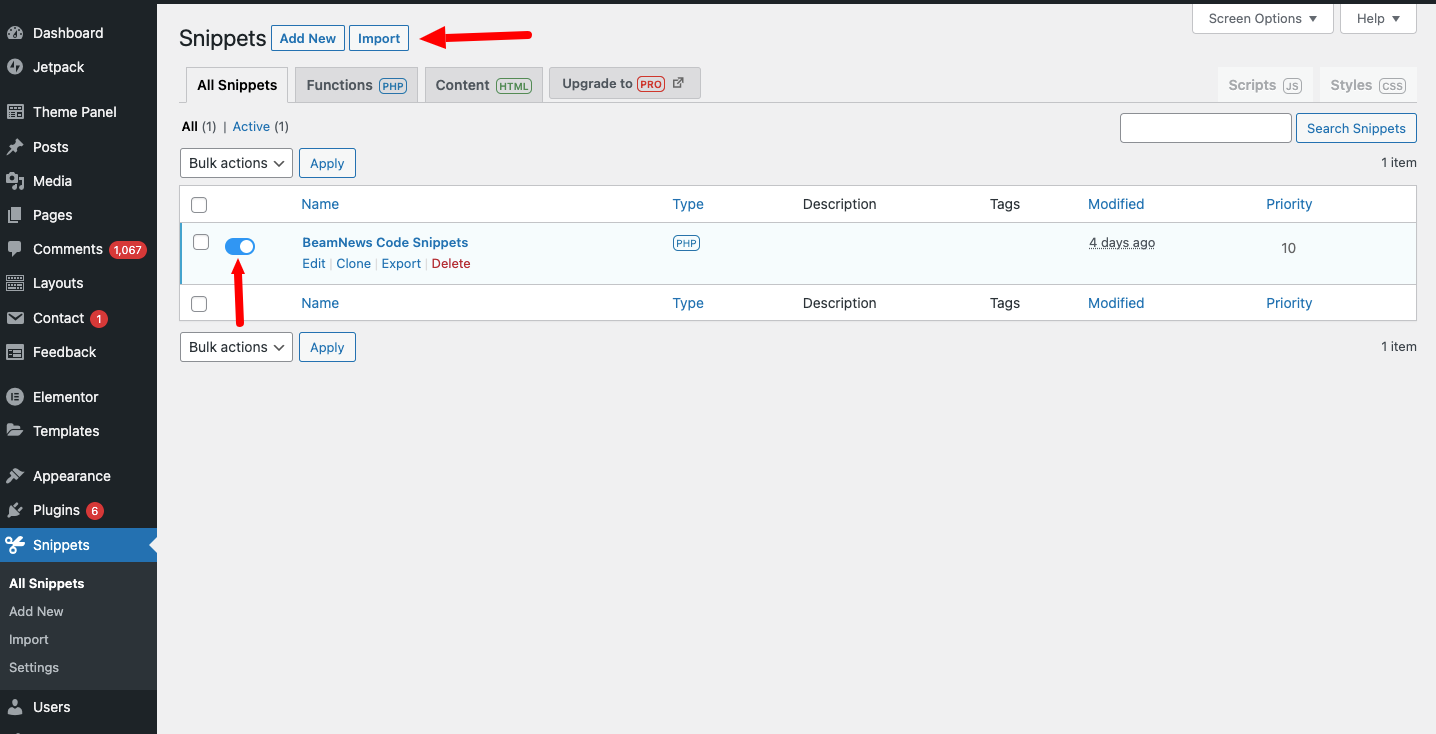
Import Code Snippets File
You must have installed and activated the Code Snippets plugin from previous steps. Now follow these steps to complete the setup:
- From the main_files folder you downloaded from Codester, you got a
snippets.jsonfile. Now go toSnippets > Importon your WordPress dashboard. Use the Import button to upload thesnippets.jsonfile and then activate it by turning on the toggle as shown in the image below:
App Setup
The complete application has been developed & built on Flutter. First, You will have to install flutter on your computer. You can use Both Visual Studio Code & Android Studio as IDE for Flutter. The steps are the same for both IDE. We have used Visual Studio Code. So, Our Setup will be based on this IDE.
Flutter Installation
To install flutter on your computer, follow the official documentation from Google.
Flutter Official Site: https://flutter.dev/
If you already have Flutter installed on your computer, then you can skip this step.
Make sure you have installed the latest stable version of flutter. If everything is okay then you can continue with the steps below.
Project Setup
After purchasing the app you will get a .zip file, proceed to unzip it. Inside the main_files folder,
you will get a folder named beam_news_app. This is the source code of the app.
You have to work on this to set up your app. Now open your IDE and open the beam_news_app folder on your IDE.
Wait some time for the project to load.
Now go to the IDE terminal and run the following commands one after the other :
- Run the following command on the IDE terminal to clean the whole project first.
flutter cleanflutter pub getMake sure you run these commands from the root directory of the project.
Push Notification Setup
- First, go to Firebase Console and sign in with your email account then go to the console.
- Once on the console dashboard, click on Add Project
- Then proceed to create a new project with your App name
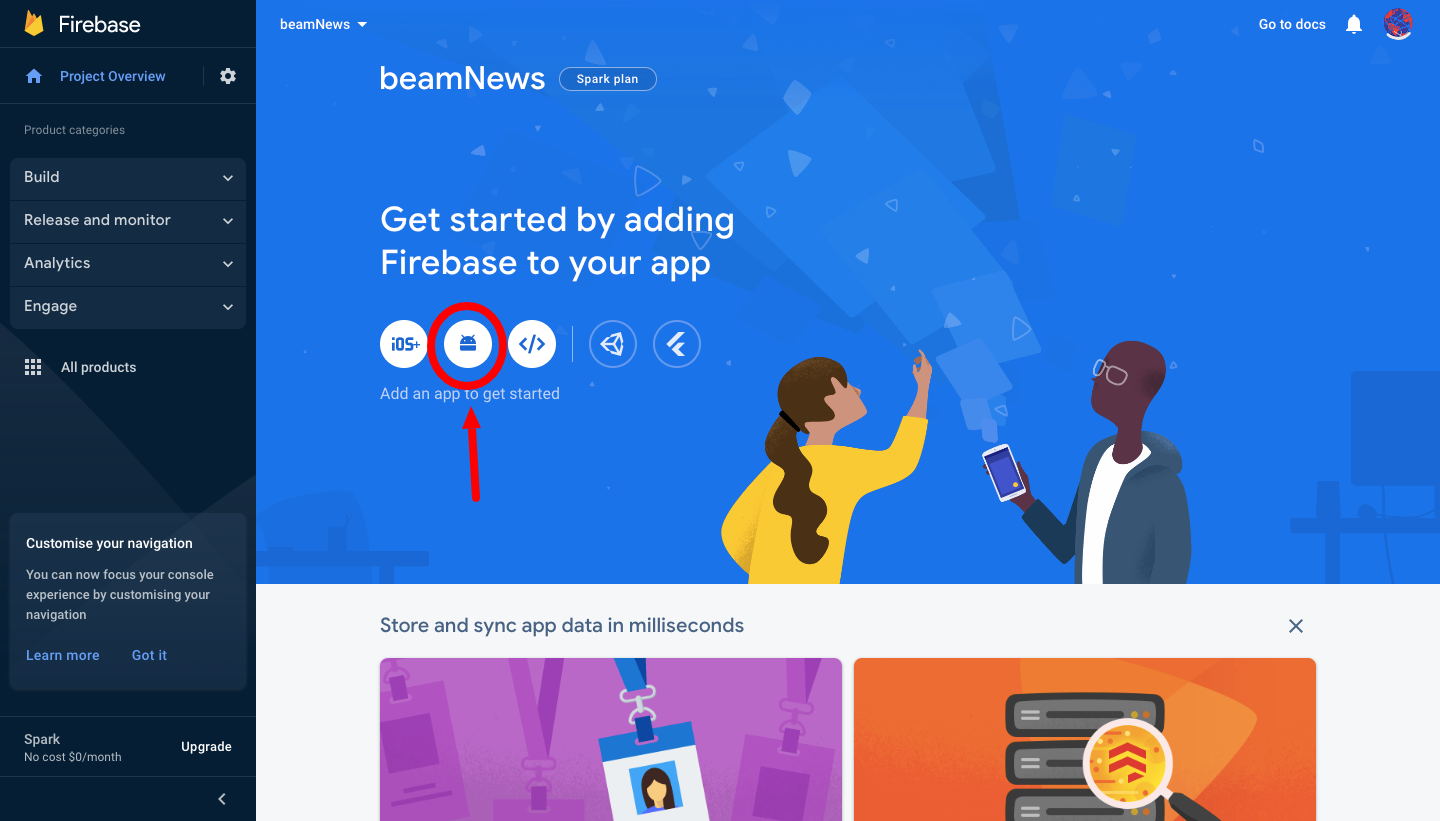
Android Notification Setup
Once you have created a project as stated in the steps above, you will be automatically redirected to the project overview. Then follow these steps to complete the Android notification setup
- Click on the android icon to add an android app to your project as shown in the image below:
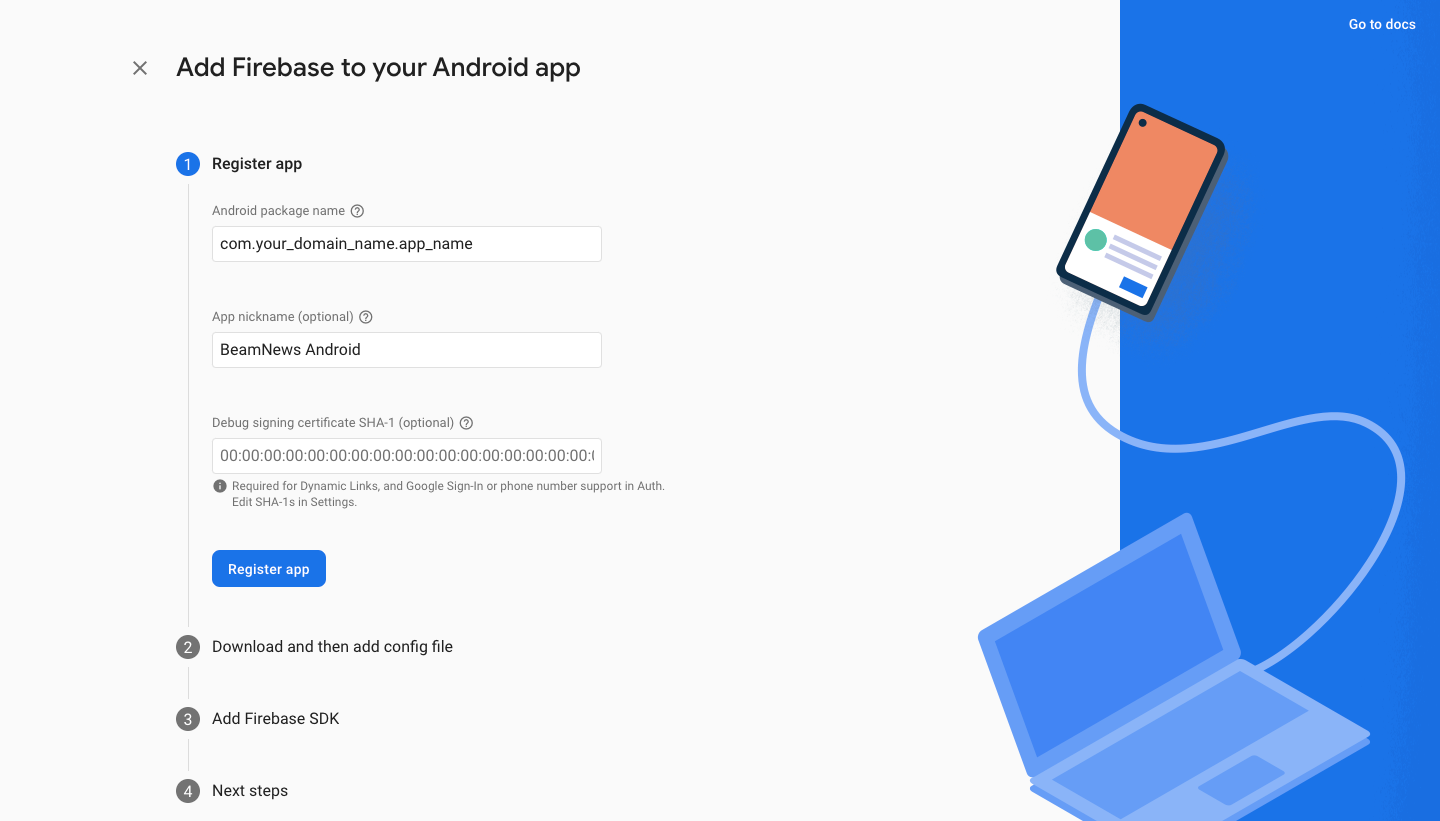
- On the next screen, add your package name and App nickname then click the Register app and skip other steps by clicking Next. See the image below
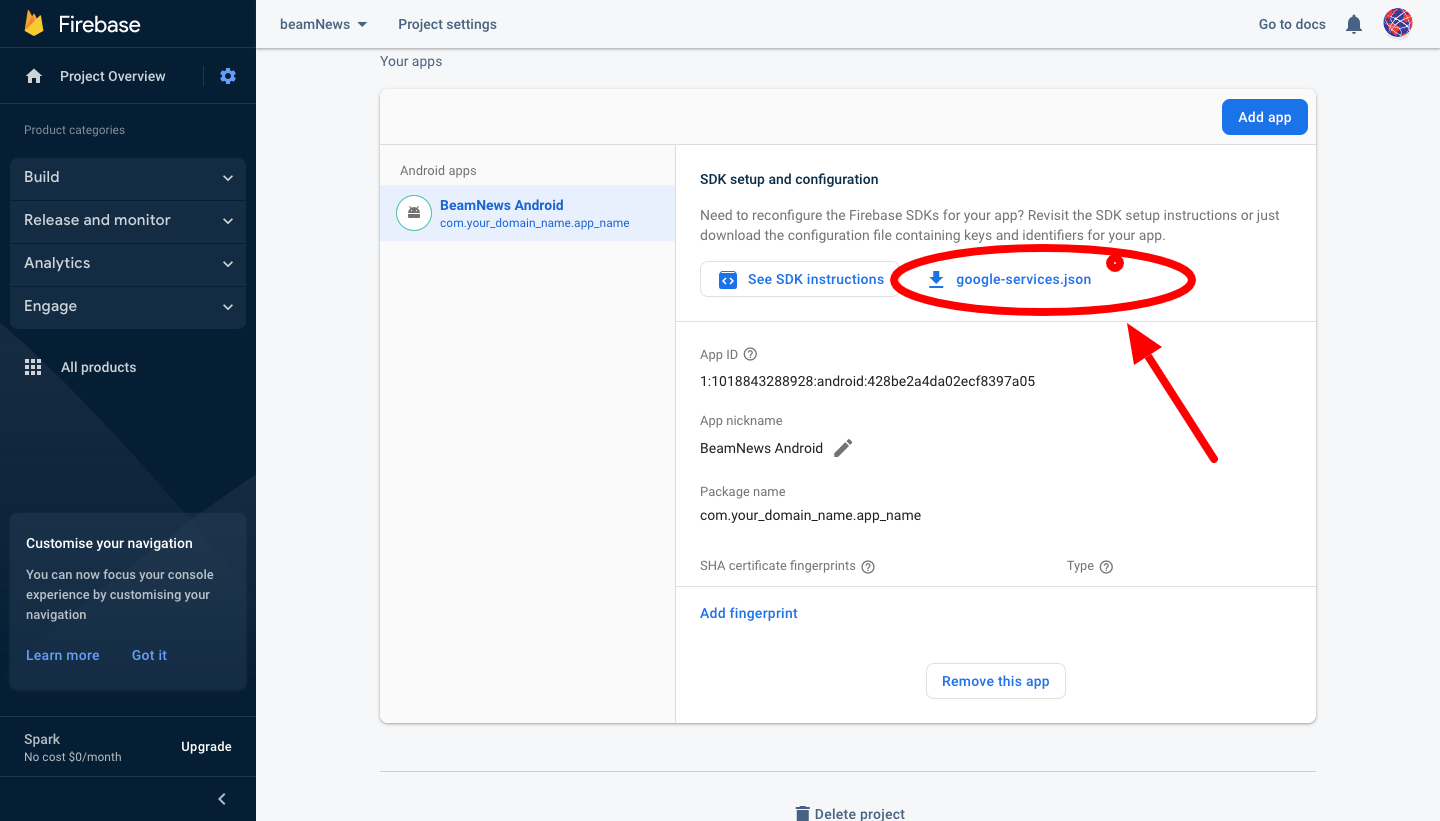
- Now go to Project Settings and click on the android icon then download
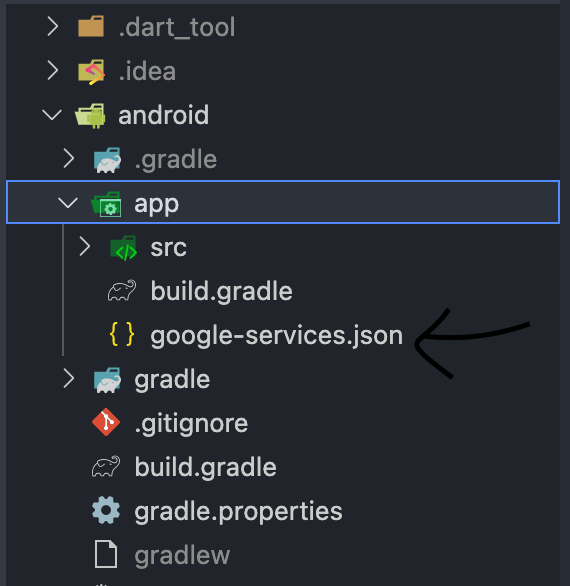
google-services.jsonfile. See the image below: - Now on the App project code already opened on your IDE, go to the beam_news_app/android/app directory and paste the
google-services.json file there. See the image below: - That’s it. Push notification setup for android is complete.
Your package name should be like com.your_domain_name.your_app_name . Example: com.google.meet. You can use the same package name for android & iOS. iOS does not support under scores in the package name. So, keep that in mind if you want to use the same package name for both android & iOS.
iOS Notification Setup
- From your
Firebase Console > Project Overview, click on the iOS icon to add an iOS app to your project - On the next screen, enter your iOS package name and App nickname then click on the Register app and skip the other steps just the same way you did for android.
- Now go to Project Settings, click on the iOS app and download the
GoogleService-info.plist file. - Now on the App project code already opened on your IDE, go to the beam_news_app/ios/Runner directory and paste the
GoogleService-info.plistfile there. - Now, Open the iOS folder on Xcode by right-clicking on the iOS folder from VSCode or Android Studio and go to the
runner folder then drag & drop the
GoogleService-info.plist file here. You will get a popup, click yes or confirm the popup message. That’s it.
For iOS, You can also visit this LINK and follow the instructions. This is a well written doc from Flutter Team. You can ignore the (Advanced, Optional) steps from there.
Finish Up WordPress Notification Setup
Remember when we setup push notification on the wordpress dashboard? We didn't fill up the API KEY. Now let's do that
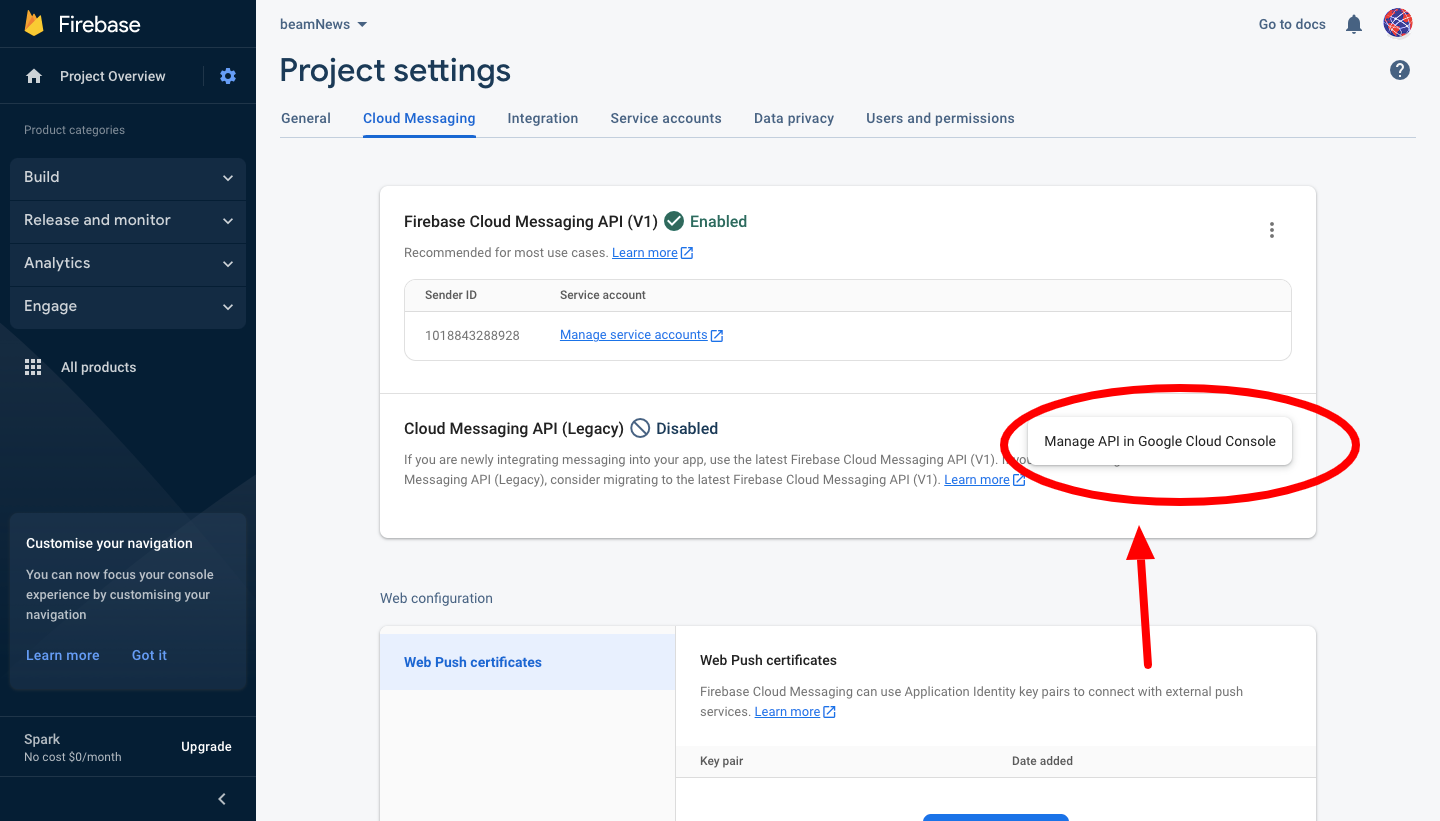
- From your firebase console, go to the
Project Settings > Cloud MessagingTab. You need to enable the Cloud Messaging API (Legacy) which is disabled now. - Click on the three dots beside Cloud Messaging API (Legacy) then click on the Manage API in Google Cloud Console. On the next page, enable the API. See the image below:
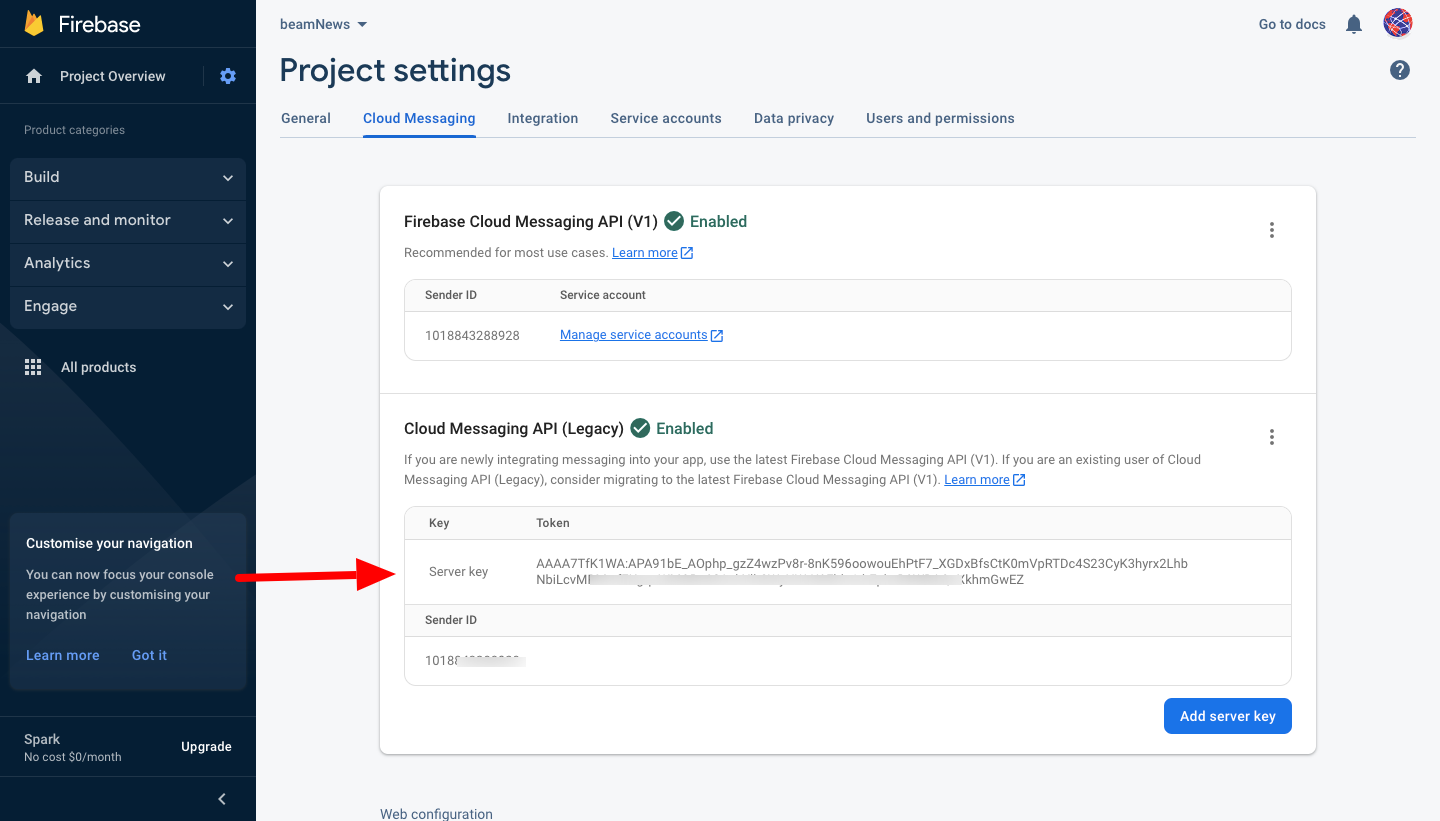
- After that, refresh the cloud messaging tab and you will see that it is now enabled and has a key. Copy that Server Key.
- Now go back to your
WordPress dashboard > Settings > FCM Push Notification from WPand paste the server key in the field for API Key and save that. That's it.
App Configuration
On the App project code already opened on your IDE, go to lib/config/app_config.dart . This file contains all the required configs for your app.
It is well commented with instructions and explanations for each setup. Lets go through..
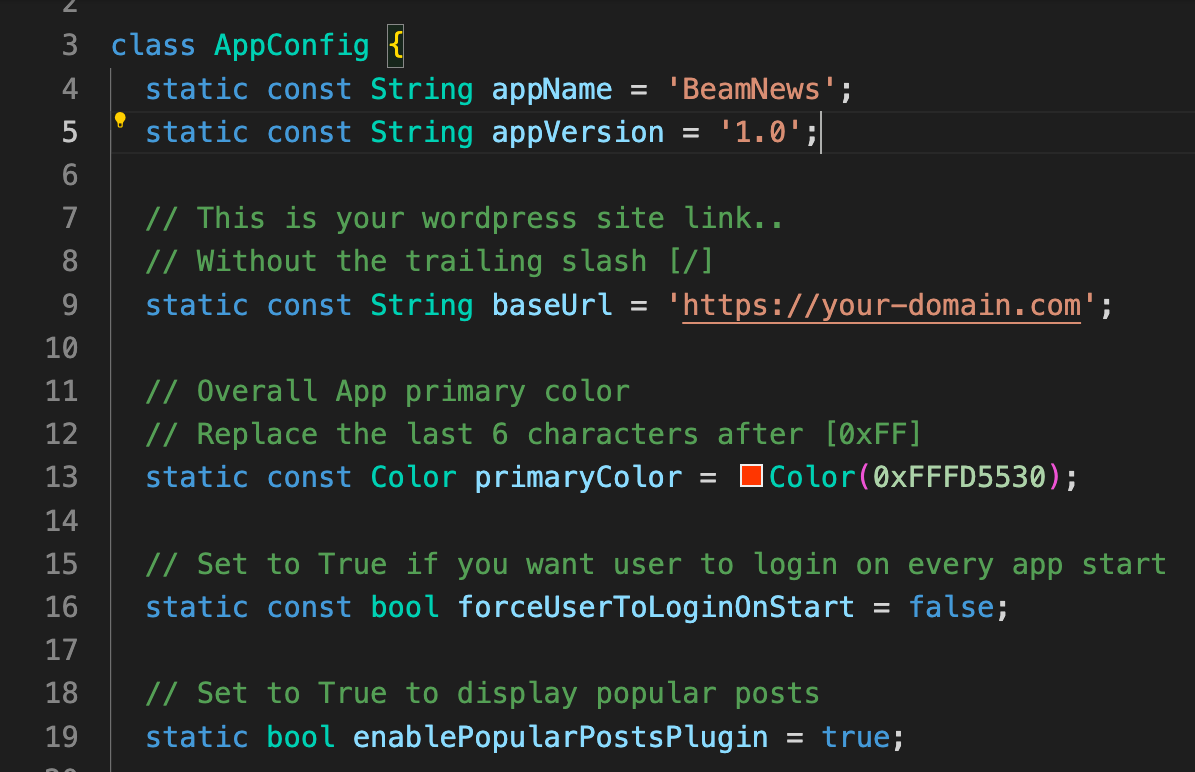
- appName - Update the value of this with your App name.
- baseUrl - You should update this with you wordpress website link.
Make sure to include
https or http(if you don't have ssl) and no slash [/] at the end of the url. - primaryColor - This is the overall app color. You should update this with your preffered color. Please note that you will have to update only the last 6 characters after [0xFF]
- forceUserToLoginOnStart - If you want users to be forced to login everytime they launch the app, set this to
trueelse set this tofalse. Default value isfalse - enablePopularPostsPlugin - If you installed the WordPress Popular Posts plugin, set this to
true. - showPostDialogOnNotificaiton - If this is set to
true, a dialog will pop up when a notification is received. If set tofalse, a toast message will be shown instead. - showLogoInHomeScreen - If this is set to
true, your logo will be displayed on the home screen - featuredPostsTagID & videoPostsTagID - Remember the Tags you created earlier in this doc? You will need to update these variables with the tag IDs. Check HERE for steps on how to get Tag IDs from your wordpress dashboard.
- featuredCategories - Featured categories are displayed on the Home screen tabs. Update this section with your preffered category IDs & Names. Check HERE for steps on how to get Category IDs from your wordpress dashboard.
- isAdEnabled - We have integrated Google Admob in BeamNews. If you set this to
true, Ads will be shown on your app.
Admob Setup for Android
- From your AdMob account, create an app for android. You will get an app id for android.
- Create 2 ad units. One banner and One Interstitial.
- Now, go to the
android/app/src/main/AndroidManifest.xmlfile and change the AdMob app id(Android) with yours. - Then on the
lib/config/app_config.dartfile, change theandroidBannerAdID,androidInterstitialAdIDwith your values.

Admob Setup for iOS
- From your AdMob account, create an app for iOS. You will get an app id for iOS.
- Create 2 ad units. One banner and One Interstitial.
- Now, go to the
ios/Runner/Info.plistfile and change the AdMob app id(iOS) with yours. - Then on the
lib/config/app_config.dartfile, change theiosBannerAdID,iosInterstitialAdIDwith your values.

Change Package Name - Android
You have to use the same package name that you have registered in the firebase console.
Go to your IDE and run the following command from your IDE terminal by changing the package name with yours.
flutter pub run change_app_package_name:main com.new-package.name
Don’t forget to replace com.new-package.name with your package name.
Change Package Name - iOS
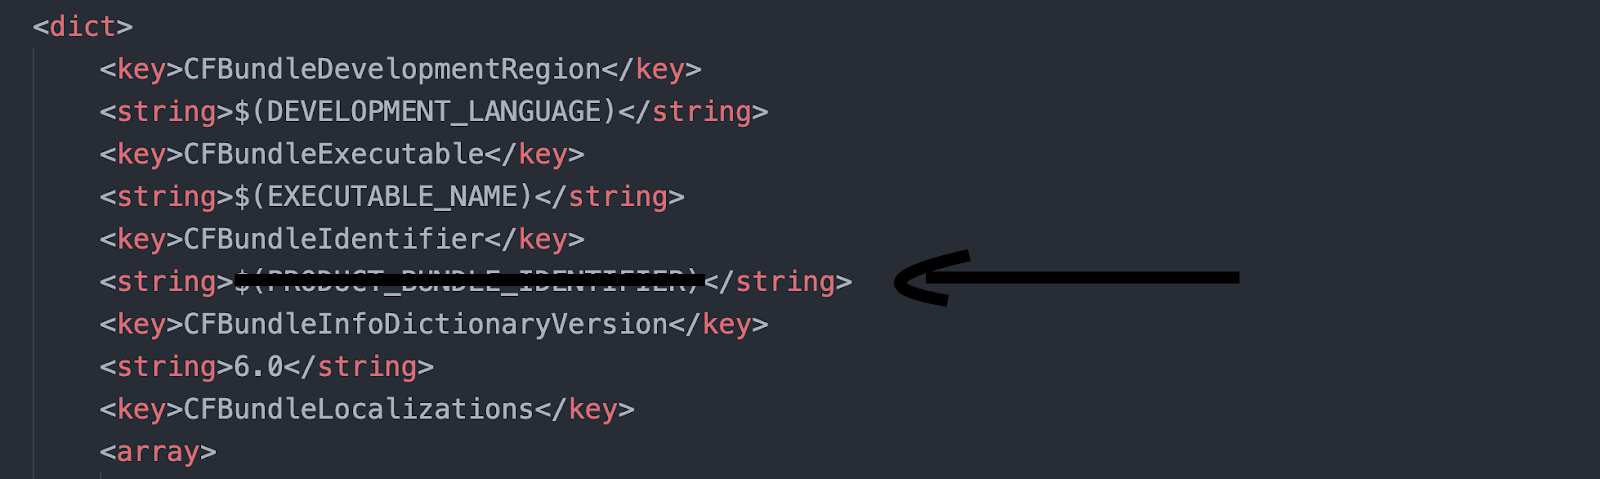
Go to the ios/Runner/Info.plist file and replace the CFBundleIdentifier value with your iOS package name. See the image below:
Multi-Language Setup (Optional)
We currently have 2 languages in this app. English and Spanish. But hey, you can add more if you wish and its as simple as following these steps:
Editing An Existing Language
If your language is already available on the list and you want to make some changes, then follow the steps below:
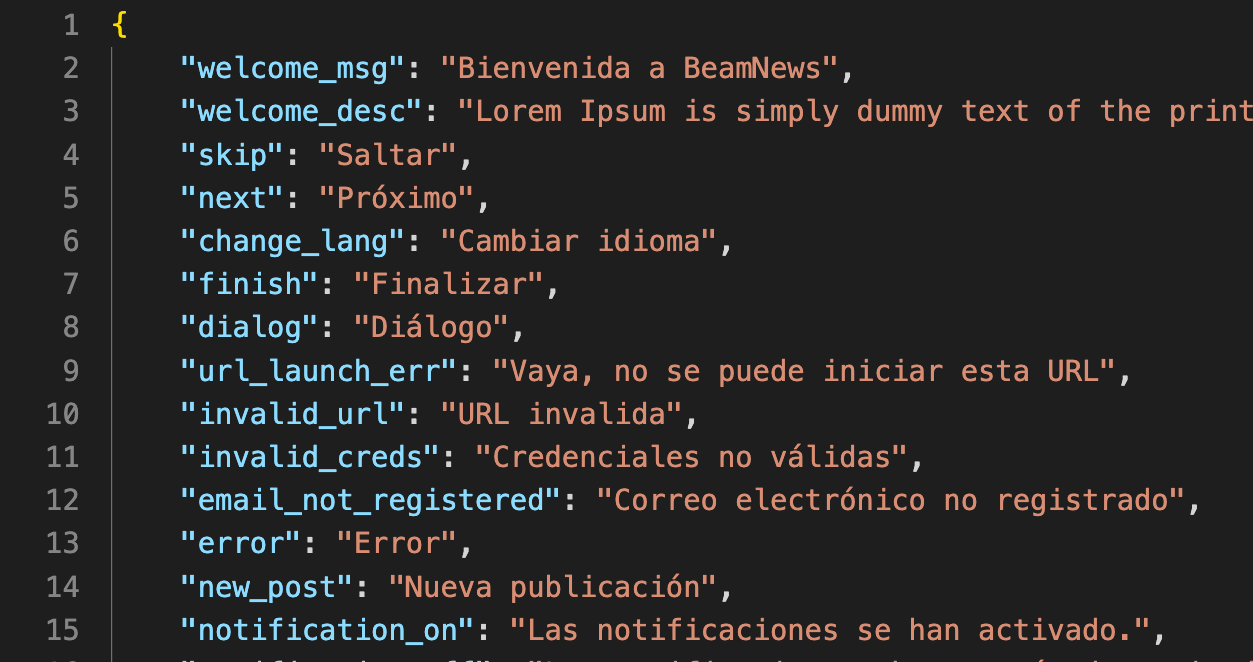
Example: If your want to change some text in Spanish language, then open the assets/translations/es-ES.json file and edit only the right-side values.
Adding A New Language
If you want to add a new language that is not available in the default list, follow the steps below:
-
First, go to the
assets/translationsfolder from your IDE. Add a.jsonfile here withlanguage_code-country_code.jsonname. Now go to theassets/translations/en-US.jsonfile and copy everything from this file and paste to the newjsonfile you just created. - Now, update all the right-side strings. Look at the
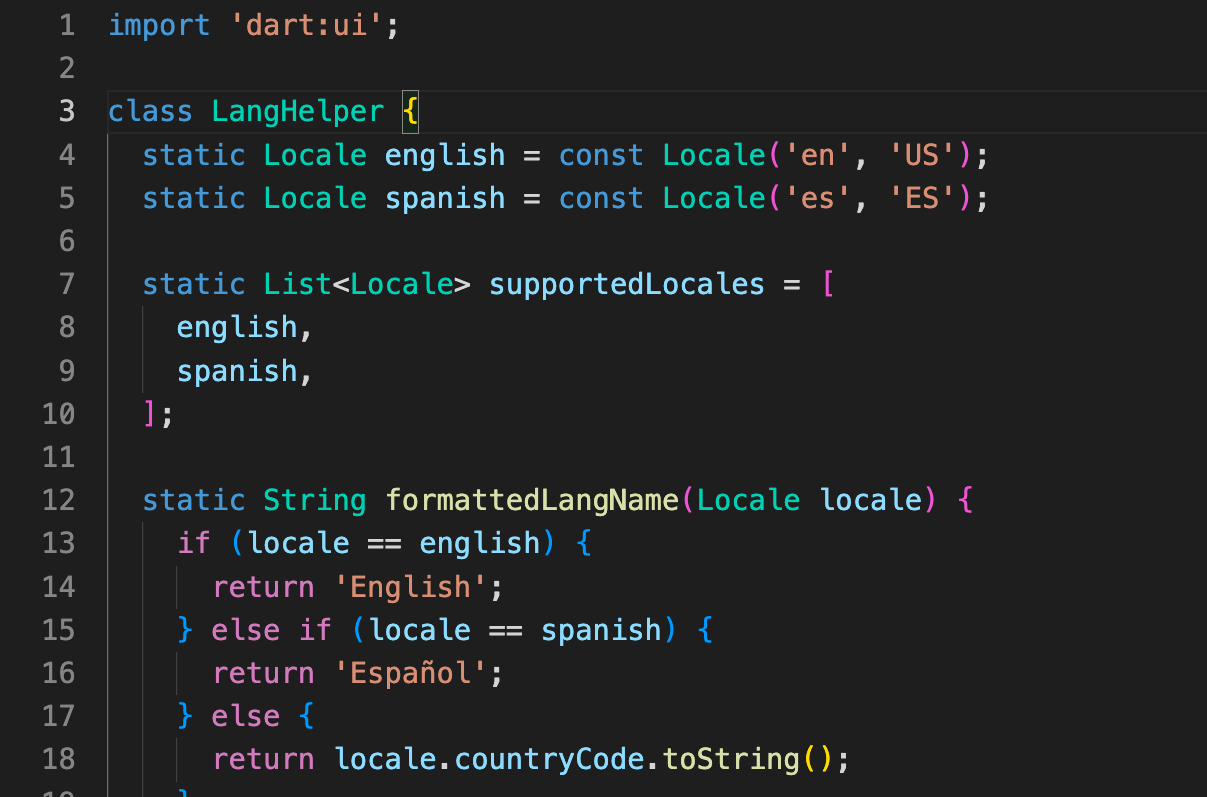
es-ES.jsonfile and you will understand what to do. - Then go to
lib/helpers/lang_helper.dartfile and add your new language just as the default two were added. See the image below: - For Android, you don’t have to do anything else.
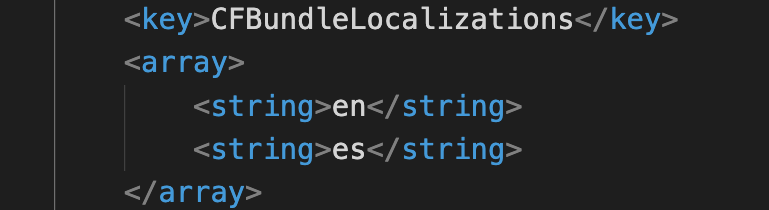
- For iOS, go to
ios/Runner/Info.plistand add your new language in the language array. See the image below.
Removing An Existing Language
To remove any language that is available in the language list, please follow the steps below:
-
Go to the
assets/translationsfolder and delete thelanguage_code-country_code.jsonfile that you want. (You shouldn't delete theen-US.jsonfile because this is the default language). - Then go to
lib/helpers/lang_helper.dartfile and remove the language you wish to remove. - And finally go to
ios/Runner/Info.plistand remove the string.
Default Language Setup
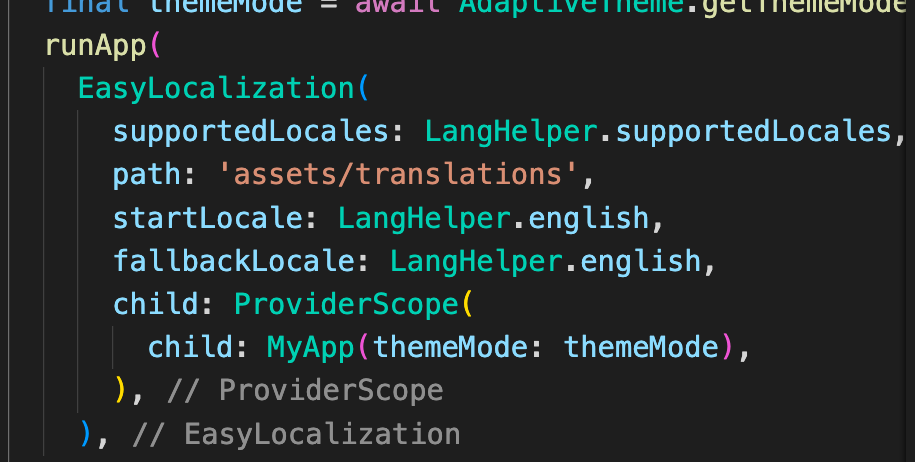
English is used as the start language of the app by default. If you want to add any other language as a Start Language then go to the lib/main.dart file and replace the startLocale and the fallbackLocale with your preffered language. That's it.
Change App Name - Android
Go to the android/app/src/main/AndroidManifest.xml file and Change your app name.

Change App Name - iOS
Go to the ios/Runner/Info.plist file and Change your app name. This should be the string value for CFBundleName
Change App Images
Go to the assets/images folder and replace all the images with yours
NOTE: Make sure your new images has same name and file extension as the ones you are replacing
Generate App Icons
Run the following command on your IDE terminal:
flutter pub run flutter_launcher_icons:main
This command will generate android & iOS icons for your app.
Generate Splash Icon
Run the following command on your IDE terminal:
flutter pub run flutter_native_splash:create
Releasing the Android App
Lets release our brand new App to Google Play Store
Generate Keystore File
Required to upload the app at Google Play
To generate a release certificate, You have to generate a Keystore file. To generate a Keystore file, run the command below from the root of your project directory.
If you are on MAC, run the command below:
keytool -genkey -v -keystore ~/upload-keystore.jks -keyalg RSA -keysize 2048 -validity 10000 -alias upload
If you are on WINDOWS, run the command below:
keytool -genkey -v -keystore c:\Users\USER_NAME\upload-keystore.jks -storetype JKS -keyalg RSA -keysize 2048 -validity 10000 -alias upload
-
Enter your details and remember the password. After this, you will get an
upload-keystore.jksKeystore file. - Locate this file and move the file into the
android/appfolder. - Then go to the
android/key.properties file and replace the password which you have inputted to generate the Keystore file
Uploading At Google Play
- To test the released android app, run the following command on the terminal:
flutter build apk --split-per-abi
build/app/output/apk/release folder. You can test the app-armeabi-v7a-release.apk file on your android device.
If you want to publish the app to google play store, don’t upload any of the above generated apk files. Use an appbundle file which is recommended by Google
appbundle, run the following command on the terminal:
flutter build appbundle
.aab file in the build/app/output/appbundle/release folder.
Now you can upload this .aab file to google play store.
Releasing the iOS App
Follow the official doc from the flutter team HERE.
Support
If this documentation doesn't answer your questions, So, Please send us Email via Item Support Page
We are located in GMT +1:00 time zone and we answer all questions within 12-24 hours in weekdays. In some rare cases the waiting time can be to 48 hours. (except holiday seasons which might take longer).
Don’t forget to Rate this product
Go to your Codester Profile > Downloads Tab > & then You can Rate & Review our product.
Thank You.
Changelog
See what's newly added, changed, fixed, improved or updated in the latest versions.
Version 1.0 (13 Feb, 2023)
Initial Release